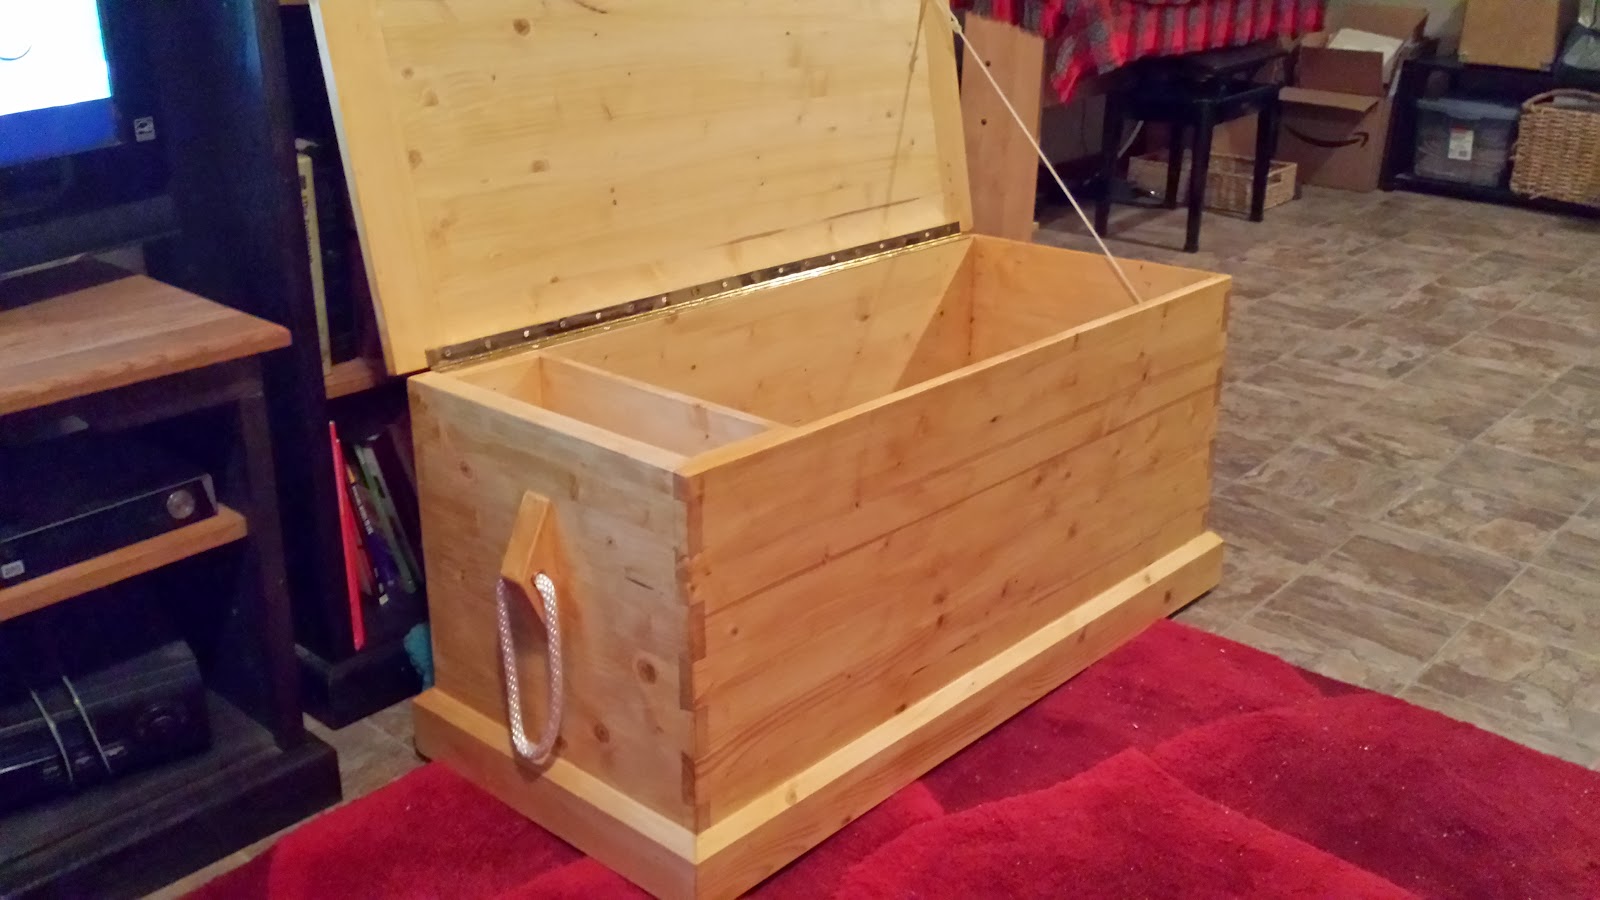
Contact us

If you would like to talk with me about creating something for you, please email to russ@jrgcustomfurniture.com. Jody and I look forward to working with you.

Saturday, November 14, 2009

Restoring Hand Planes

One of the joys of working in a well equipped shop is that it is much easier to maintain and restore tools. A case in point is my latest Craigslist find.

I picked up several old planes for a few bucks. Stanley 3, 4, 5, and 28 , a couple of Craftsman, some non marked ones. Most were pretty rusty and banged up. I wanted to get a couple of the better ones in working condition right away -- a Stanley No. 4 and a No. 5. I had to fix a broken rear grip on the Jack plane and mostly just clean things up and lap the bases.

After I sharpened the irons, they were cutting gossamer curls off a maple test piece.

OK back to the nasty ones. The easiest way to pull rust and paint off is electrolysis. I'll let you follow this link to find how to set it up. It is a very thorough article covering a very simple subject. To quote the author, "this ain't rocket science."

Here is the Stanley No. 3. It is suffering from a broken rear grip, missing front grip (and the screw is broken off in the metal stem), and an unholy amount of dirt and rust everywhere. Look and weep for the wasted years of neglect and disrespect ;o)

The plane body is dangling in the electolysis solution tonight, so we'll see how it looks tomorrow.

Bookcase in Cherry

This one is 95 x 39 x 12 with a bin drawer on bottom, crown mold at ceiling and adjustable shelves. Carcass will be 3/4 cherry ply with a solid cherry frame.

The customer wisely chose to finish without stain. I think it is a shame to stain such a beautiful wood.

Saturday, October 31, 2009

Mitered Boxes


More cool ways to use up some of that endless stream of small scrap. These boxes are attractive and fun to build.
In the collection on top, there are a number of uses of spalted Birch as well as Mahogany, Spruce burl, Oak and Maple. Click the image for an enlargement.

Of the two in lower image, one is quarter sawn White Oak with a knotty Maple top -- the other is natural Maple with a quilted Mahogany top and a green felt bottom inside. Both are about 3 inches square.

Thursday, October 15, 2009

Another Tall Bathroom Cabinet


I guess the stars are aligned for tall cabinets this month. This one will fit in a 22.5 in x 94 in space and be 16.75 in deep. I will have to fit it pretty tight between two walls.

Although only the front will be visible, the customer wants the inside to look nice too. I used a light hardwood plywood for the box, stained and varnished before assembly, and put 1/4 white melamine on the back to give a little more light inside the deep cabinet.

I picked up a sheet of cherry veneer to press the door. The customer desires a plain continuous door rather than a frame and panel. I'll trim the edges of the substrate with cherry, press on the veneer (with vacuum press) and attach with three self-closing Blum face-frame hinges which attach nicely to the 3/4 in. cherry.

Since I wasn't particularly excited about hauling a 94 in. cabinet up a flight of stairs, I made two boxes and will cover the joint with one of the frame rails.

Delivered (just across the street) the parts and set them in place in its alcove. Perfect fit! Had to trim a little off the bottom of the frame because the wall came out about an eighth inch around the shower pan. So I got to get some use out of one of my "new" planes.

Oak Drop-front desk

Making a drop-front desk in the style of Harvey Ellis when he worked for Stickley. It is only 30 in wide and 11 in deep, but it will be heavy. The carcase and back are all 3/4 in quarter-sawn white oak, and the pigeon-hole assembly is 1/4 in oak, resawn from 3/4 in boards.

This design would be terrific for using a laptop with a wireless connection...especially in a restricted space.

I got some nice oak burl veneer to make the outside of drop-front panel.
I've been too busy to take pictures, but I have a lot to put up...soon ;o)

This is a representative of the design I am making:


Getting it assembled... that burl panel turned out pretty nice!

Tuesday, September 1, 2009

Children's Rockers

I'm cleaning out some of my Oak and Mahogany scrap to make 5 kid-size rockers. I have an order for one as a Christmas present, one to give away to a friend, and three for inventory.

Here are the first two....ready for upholstery. The mahogany one will get just a seat, but the oak one will get seat plus a fabric back, rather like a director's chair.


I made ebonized plugs for the mahogany chair, with pyramid ends -- kinda fun.

Dining Set

This project is for a dining table with pullout leaves and 6 chairs. The table will be a trestle with draw-leaf extensions, aka Dutch pullout. Customer is interested Mahogany with Ebony accents.

Sized for a small dining room, I am drawing it for 42" x 52" with 19" leaves. That should give four people nice space and open to seat eight.

Top will be a custom veneer job using a couple of different woods. We haven't come to a final design on chairs yet.

Update: nix the Mahogany, she wants Maple finished natural. Now I have 35bf of 12/4 Mahogany in stock ;o). No worries, it will find a home.

Tuesday, August 25, 2009

Kreg Precision Miter Guage and UniT Fence


I bought the Kreg miter guage to upgrade the stock Unisaw guage. I was disappointed in the diagram and instructions for set-up. It looks like they made some changes to the product but didn't update the documentation.

No worries, it wasn't hard to figure out. I also had difficulty getting the 5 nylon set screws started in their respective holes in the main bar. Perhaps some clean up of the threads after milling was needed.

The negatives aside, this is a fine tool. It is easily adjustable both for position left and right and angles. I especially like the brass indexing post for quick set of 9 different positions.

I like the Flip Stop for accurately trimming multiple pieces. It is easy to set for an accurate cut and there is no need to be fussing with clamping a stop block and remeasuring.

Amazon sent free shipping for $139.


The Uni-T Fence is an aluminum extrusion with UHMW face that replaces the stock Unifence extrusion. I like this very much for the extra t-tracks that allow attachment of hold-downs and such.

Thursday, August 20, 2009

Resawing on a 14" Bandsaw

Variables to control when resawing:
1. Blade width and tension
2. Gullet size/teeth per inch
3. Blade tracking
a. Blade position on tire
b. Unique 'lean' of the teeth
4. Feed rate

1. For a 14 inch saw, 1/2" blade should be enough. Crank up the tension and ignore the indicator on the machine. Look for 1/4 inch deflection with the guides backed off. I like the Wood Slicer from Highland Tools -- about $30 but worth every penny.

2. Three teeth per inch will run cool and allow for plenty of sawdust removal. A hot blade won't track.

3. Adjust the blade position on tire to get it cutting as straight as you can. Forward of center will cut to the left, back of center will cut more to the right.

Do test runs while resawing against a curved or single point resaw guide. You will get the exact angle the blade wants to follow. Then, switch from the single point guide to your fence set at that angle. If you see the face of your resawn plank bowed, tweak the tail of the fence to right or left just a smidgen to make the blade saw flat.

4. Avoid heat and don't rush it. Your eyes and ears will tell you what works. Push the last inch or two with wood, not your valuable fingers ;o)

Wednesday, August 19, 2009

Oak Dining Table Restoration

This table is an enigma to me. A frame and panel Dutch pull-out top with carved, cabriole legs and exposed tenon pins seems like a mixture of styles.


Whatever it is - it is a fascinating table. The customer bought it in Texas several years ago and has used it as a dining room table. It had begun to look pretty worn, especially the finish on top, so she asked me if I could make it look nice.


There are no identifying marks, but from the look of it, I'm guessing early part of the century. It has no screws or metal brackets -- all joints are mortise and tenon. Legs are carved out of solid 4x4 oak with 1 1/4 in. aprons and top frames. The frame joints on top are pinned with two 3/8 in. oak pins. The carvings are beautiful and in fine shape and the cabriole legs have only minor damage.


It was finished with shellac, which points to why the finish looked so bad on table's top. A few spills of water and alcohol will get nasty if unattended. Fortunately, shellac can be restored with a little of the same to redissolve it.

First I scrubbed with Murphy's Oil Soap, then a rubbing with mineral spirits to remove any wax.
After it was clean, then began the restoration of shellac...

more to come.

Wednesday, August 5, 2009

Canoe number two

Building another Prospector 16. I really like the one I made a few years ago and I have the forms, so why not?

I got a beautiful yellow cedar plank from a friend who bought several from a sawmill in Canada--old growth trees reclaimed from the bottom of a lake. Now I'm ready to start making strips.

First job is to rip the 1 in. blocks off the big board. I made a long series of supports by screwing rollers to my cabinet saw table, workbench, another table saw and finally a couple of outfeed supports. What a funny picture !


After all that, the Grizzly kept overloading the circuit, so rather than mess around with it, I sold it and made a mobile base for the Unisaw. Made enough money selling tools on Craigslist that I can get a couple of GripTite magnetic featherboards and a Kreg Precision Miter System.


Well, I rearranged the shop and turned the Unisaw around 180 degrees. Cutting the plank on the big Unisaw was easy and I got the strips all ripped in 2 days. When I get a spare day, I will do the bead and cove thing and we'll be ready to make a canoe!

Sunday, July 19, 2009

Deacon's Bench


A friend who has luthier skills fixed my Big Baby Taylor so I said I would do something for him. He needed a place to sit down and take off his shoes near the front door and hoped to have a storage area inside.

Major concern was cost of materials.... Since he had pine in his stairway area, and common pine is about $1.30/sq ft here, that's what I used. I had a bunch of scraps to add into the mix, and the result is pretty cool. To make it a bit distinctive, I carved his family initial on the back rail.


This was an opportunity to try a new system. I used pocket screws on all the frame pieces and biscuits to join frame to leg. Very quick and accurate compared to traditional joints.

The panels are mystery wood... the "B" side of 1/4 in. luan left over from doing drawer bottoms on another project. Pretty amazing grain pattern.


Saturday, July 4, 2009

Dog Feeder and Pull Cart


I make these in quarter-sawn white oak and African mahogany to fit 2 qt. steel bowls.

The picture is oak varnished without stain. Both the oak and mahogany can be stained to suit.

A pull cart for my big dog. Oak and electrical conduit. Nice and light.

Children's Rocking Chairs


A pair of Oak rockers for some very young customers. Obviously, one is for the little girl, and the other is for her big brother.

Both are made in the same quartered white oak as the big chairs I do, but to save time and expense, these were jointed with pocket screws (Kreg jig) instead of mortise and tenon.

Wednesday, June 24, 2009

Bathroom Cabinet - Cherry and Etimoe veneer

This will be a tall cabinet for customer's bath (24 x 84). Carcass of cherry ply, frames of solid cherry and hand-wrought iron leaf pulls. The upper area will have a 48 x 24 door whose panel is made with some beautiful Crema Etimoe veneer I picked up from joewoodworker.com. Lower half will contain 4 drawers.


Here is a sneak peek at a raw portion of the veneered panel. I bought two 9" x 53" pieces. A little expensive, but as you see, unusual. I trimmed and pressed the dark edges together for a stunning effect. Once finished, it will be more intense in color.

TIP - To get a long, true joint in this veneer, I just sandwiched the two veneers between a couple of straight boards. The veneer edges protruded about 1/4 - 1/8 in. Next, I ran the assembly past a pattern bit on the router, and voila, a perfect joint. Of course, careful and adequate application of veneer tape on both sides helps draw that joint tight and ready for pressing.
A couple of vacation days, and here is the result. I used some cherry shorts the supplier had for about 50% of normal price, and some were very interesting grain.

Side is 3/4 cherry ply... $118 a sheet !


Drawers are 4/4 cherry, with those hand-made wrought iron pulls.


And the final product.

Wednesday, April 22, 2009

Canoe building tips

My first canoe...see here, was a little bit of a challenge and I'm ready to do another with some experience under my belt. Don't get me wrong, my canoe handles well in the water, I'd just like to show off a little ;o) John Lucking in Eagle River builds some beautiful strippers and I went to his shop this week for some tips.

He gets yellow cedar lumber from a small mill in Canada-2x10x20ft quarter-sawn boards are what he uses to cut the strips from. That is one area I don't have a source for yet, but decking cedar works well too...just not as homogeneous in color.

This is what I took away from the trip:

1. Use 5/16" bead and cove bits to mill the 1/4 " strips for a tighter fit. John seems to like 7/8' width on the strips.

2. Don't staple, but clamp strips to forms with squeeze clamp. Each form has cutouts to accept clamps. Use a long clamp to pull the strips together if necessary. This is visually pleasing, and is a LOT less work than pulling about a thousand staples.

3. Assemble with the bead up so clamps don't damage the cove....although, using an appropriately sized dowl in the cove will protect it if you want to do it that way.

4. If using an accent strip, lay it first and add towards the sheer second. Lay the accent strip so it rises up toward the ends. An accent level with waterline will look odd.

5. He builds with a small interior stem and a cold laminated Ash nose. The inside of bow and stern are covered with a small feather-shaped piece of plywood. Avoids the necessity of cleaning up that nasty area of fiberglass and is a little cleaner looking.

6. After laying up the strips, the ends of canoe are belt-sanded flat and a notch cut in the "keel" to accept the ash laminations. Laminations are clamped with bungie cords and or nails until dry.

7. Gunwale sections are 5/8" Ash. He cuts scuppers in the inwale and screws them together. I personally don't like the extra weight of metal, and epoxy certainly won't fail.

8. Finishing West System 105/207 and Behr varnish

Sand outside of hull. lay glass on outside. One layer of 6oz is all he uses--no extra 'football'. Sand the outside smooth. Flip the hull and lay interior glass, sand.

Glass resin inside is layed with latex-gloved hands, mixing 5 pumps each of resin and hardner per batch.

Add the gunwales and decks, cut the painter hole in and whatever else.

Flip it upside down again and finish the outside/varnish. Clean up the drips on gunwales and finish the inside with non-gloss varnish. Use high gloss on brightwork.

8. Seats hang from inwales with wood cylinders for spacers and brass bolts. The whole assy is epoxied together. I like the idea of using trapezoid shape spacers to minimize the tendency of the seat to rock.

Tuesday, April 14, 2009

Cherry scraps = nice shelf


A shelf in our break room at the day-job looked pretty sad and was pulling out of the wall. so.....

I had some left over cherry veneer and a little solid stock for edging. I pressed the veneer over two thicknesses of 1/2 in baltic birch drawer stock and finished it with water-based acryilc.

The brackets are made of 4/4 oak. These won't fail !


Wednesday, December 3, 2008

Display Racks for Plate Collection

Plates have been traditionally displayed on wide rails/moulding above wainscoting , on single bracketed shelves with a back, and of course in a hutch.

More contemporary designs might be a floating shelf or a vertical or angled main strut with levels of single shelves.

..Customer needs assurance that Alaskan ground tremblers won't dislodge the valuable platters, so they'll need to have enough lean to put the center of gravity well back. For the biggest plate, 16" D and 3" high, that would require the plate groove at least 4" from wall.

Final dimension request 51 in wide 5 in deep with two plate grooves 1.25, 3.25 in from back and a rail approx 3/8 in thick.


Side note: According to UAF Seagrant website:

Since 1900, Alaska has had an average of:
  • One magnitude 8 or larger earthquake every 13 years.
  • One magnitude 7 to 8 earthquake every year.
  • Four and a half magnitude 6 to 7 earthquakes per year.
  • Twenty magnitude 5 to 6 earthquakes per year.
  • Ninety magnitude 4 to 5 earthquakes per year.
The cherry is all cut and dry assembled...will take it all apart to stain and finish.

Finally delivered... Customer was quite pleased. She said she was "doing the happy dance." Nice to be part of her enthusiasm.


Wednesday, October 22, 2008

Bathroom Cabinet

Customer wants unique cabinet for a small bathroom. He has personalized and trimmed out his condo with PS Red Oak. The bath has all new decorative tile work that he doesn't want damaged with nails or screws.

The cabinet will be free-standing and fixed in place with a few applications of adhesive caulk. If he moves, he can take his cabinet with him.

The top is to be PS Red Oak, with dovetail splines to keep it stable underneath the vessel sink.
The panels for two drawers and end will be veneered Madrona burl:
Legs are wedged through-tenons for strength and interest

The treatment on Oak trim elsewhere in house in unstained with Tung oil finish. It seems suitable to do the same on this cabinet.

Dry fit of doors on the workbench looks pretty nice.


And, installed with the vessel sink :

Book Shelves

This project might be called an entertainment center, because it has three parts with a flat-screen HDTV in the center. But customer just has the screen and video equipment under it in a small cabinet, with two, 40"x84"x13" bookshelves flanking.

She wants a solid Oak face-frame on a veneered plywood case. Finish with black dye and varnish for an old-world kind of look.


Turned out pretty nice. The black matches a couple pieces of black mahogany furniture and HDTV. The wood tones match the Arts and Crafts rockers in the room . Since they were so big, I moved the completed boxes down the split-level stairs to negotiate a narrow hall. After they were in the room, I finished the crown and foot moldings and installed shelves.

Who knew building furniture involved such a lot of fun moving it into place?

Sunday, October 12, 2008

Hatch Cover in African Mahogany

My customer wished to have a cover for his access hole in the floor of his cupola. It's so annoying when guests fall through a 2'x3' hole in the floor.

This has 320 epoxied half-lap joints and each of the 76 end tenons is epoxied to the frame. In spite of the size, 13/16, each member of the grid shares load with its neighbors for a much greater combined strength.

2 coats of shellac and 2 coats polyurethane will give it years of durability.

Nice grain too!


Wednesday, July 30, 2008

Odds and Ends

There is such a difficult time in my shop when cutoffs of beautiful woods are destined for the fire or garbage. Thus, my burgeoning boxes of small chunks and sticks of hardwood.

Here are some examples of what I'm doing with them.

A recipe holder with copper clips:


Random strips of Mahogany, Maple, Padouk, Oak make nice cutting boards:


And some end-grain Oak and Mahogany make a gorgeous 'butcher block' kind of board:


Musical instruments for the 'kids'. Age not checked.

Tongue Drum:

Wednesday, June 11, 2008

Office Desks

Customer wants matching desks similar to an image she found on Internet.

Natural Maple is the species.

Cust only wanted one drawer, so it is cut from the same board...notice grain.


I used iron pulls created by Mark at Alaska Forge.

After some sample stains were presented, customer decided she would rather have just varnish.

Sanded to 220 and two coats of clear satin urethane will keep it in good shape for years to come.


Tuesday, June 10, 2008

Mission Plant Stands and piano chair

We have an order for a couple of plant stands with art-tile inserts in the tops.

One will be 12x14x30 and one 12x12x25 with 4, 4" tiles in the top.


The chair is to be a low-back chair for additional seat for the piano...to accomodate the 'instructor.'


Since the piano is mahogany, we'll design it with that wood and use a five-spindle back,

Perhaps something like this with shorter legs..seat height needs to be 18 in. Front width is 15 inches and depth of seat is 16 inches. Back will be just high enough for lumbar support.

This chair will likely have a wood seat rather than leather.

Monday, June 9, 2008

Oak Rocker Restoration

..


My client found this at a deceased relative's domicile. The poor thing had spent a number of years outside on the porch. It appears to have been wet and in the sun a lot. All the glued joints were loose the cushion had a number of springs broken, the seat material was torn, one rocker had broken along a weak grain runout, and had been repaired with three bolts ( oh, the horror !).


I am asked to restore to as normal an appearance as possible, using a leather box cushion instead of the spring seat. The only thing I must preserve is the manufacturer label... Grand Rapids Bookcase and Chair Co.

A little research let me know the company was one of several Arts ad Crafts furniture manfacturers in Grand Rapids at the turn of the century...including Stickley. This chair is made wih some nice quartered White Oak, with 5/16 and 1/2 in dowels for tenon pins. The only screws used were attaching the arms to back rails and fixing the rocker to the legs.


notice the top of the back posts...Originally glued up with two pieces..both delaminated.
Here you see the split back post, broken right rocker and the sad state of cushion.

Actually, this is a very nice design and I think it will come out pretty nice.

It took me about an hour to disassemble the rocker and another couple of hours regluing. The rockers are in such bad shape I'm going to have to make new ones. I had to redo the broken one anyway, so might just as well do both so they match ;o)


Marking for new rockers.


Glue and pin.


Nice flake on arms...


And the old girl is looking pretty again! And no more wobble in her bones.


Wednesday, April 30, 2008

Mahogany Mule Chest

Finished Mule Chest


My favorite customer has commissioned a big 11-drawer Mule Chest to match her African Mahogany bed I made 5 years ago. From Veneer Supplies, I have purchased some beautiful curly Mahogany veneer for the end panels. There are 18 pieces in the bundle. Each is about 7 in x 82 in., so I'll have plenty for a couple of projects. Since my panels are going to require only two or three strips, I'll have plenty for the drawers if we go that route. The cost was about $170.00 delivered, so that pencils out to $2.50 per sq ft,


Chest dimensions will be about 5.5 ft wide and about 45 in high. Maybe should add handles for the poor guy who has to move it!


The carcass is now glued up. I used some beautiful curly mahogany veneer for the end panels with a substrate of 1/2 MDF. the 2 1/4 in. legs are mortised for all the panels, rails and drawer dividers. Through tenons on the bottom and a dovetail on the top rail holds every thing tight--even if there were no glue.


Drawer boxes all done in 1/2 in. 11-ply Baltic Birch

Will pick up 30 board feet of Mahogany for the fronts and we'll be ready to stain. Getting ready for Jody's happy dance when I haul it upstairs.


Attached the drawer fronts, and decided I don't like them this way. Going to redo the guides and resize the fronts to make a flush drawer. Unfortunately, since the drawers will be an inch deeper now, I will have to cut that inch off each drawer back and reglue.

This looks nice, but just not Arts and Crafts style.

It is June 18, I got the drawers rebuilt and ready to stain. I decided against the bronze pulls at 15 dollars apiece. Will have to wait for a while on those. My wife is anxious to finally have this unit in the bedroom -- she's been postponed enough with other paying jobs and a move. I started this back last Fall!

Tuesday, April 22, 2008

Scroll Bench

The customer who purchased the original mahogany scroll table wants a bench in the same design for the entry way. Dimensions 36 x 17 x 18 H.

By now, I have developed a reliable construction method. The rectangular torsion boxes are made from 1/2 in. Birch Ply, 1 1/2 in. rigid foam and 1/4 in. plywood skin. The shoulders also made with 1/2 in Birch web with a curved web every 3 in or so. The drawing and cutting of the curved sections needs to be precise in order to have a exact 90 deg corners and a fair surface after skinning.

The 1/4 in. skin for shoulders is 3/8 'wiggle board' planed down. to dimension. On this project, I will roll on the Unibond-800 for skin-to-web and skin to veneer all a one time. This will save a bunch of time now that I have conifidence in the vacuum clamping of skin to web.


A little polyurethane construction glue and a couple of lag screws pull the parts together. The joints are so tight, I'm tempted to just leave them, but now the inlay has become a design element.


This is how it looks after the lye wash and stain.

Friday, April 11, 2008

Shelf with inlay


This was a great way to use up some mahogany veneer scrap and a little 1 in lumber I had layin' around the shop. I got the idea to make the company logo by glueing up some mahogany and pine.
It was a humble place, the men's room, but a needed change from the old one someone made out of construction lumber.

Wednesday, March 5, 2008

Scroll Table


We have another order for a mahogany scroll table. 40x40. This one I am doing much like the one in an earlier post. The skins are 1/4 in. ply and the 1/2 in frame for top section is three sections filled with 1 1/2 in. blue construction foam board. The last one had 3/8 in. skins. I realise now the table was way over-engineered. I could have put a refrigerator on that first table.

I made the corner sections in the original radii 3.5 in -> 5 because I skinned it with 2 plys of 1/8 in bending poplar. Bending poplar will deform to almost 2 in. radius.

I'll use the BubbleFree ribbon mahogany veneer from Oakwood Products. Expensive, but worth it to have assurance of a nice surface. Two sheets delivered is $200.


Top and legs are screwed/glued to the curved shoulder. The resulting joint is routed to 1/4 inch and inlay of mahogany inserted.

Instead of buying more 1/8 bending poplar, I had some 3/8 'wiggle board' left over from an earlier project. I just planed it down to 1/4 inch-- worked great for finishing the inside curve. As a matter of fact, I think I'll do this whenever I need tight curves.


Edge material applied and routed. I did a lye wash and then applied some alcohol-based dye -- 1 part red, 2 parts walnut. That created a warm reddish base for the mahogany stain.

Monday, February 18, 2008

Special Dog Furniture


Here is a feeding station in the Arts and Crafts style:

Tuesday, January 15, 2008

Medical Chart Rack


A local dentist's office needed a large chart rack. This one will be 72 in high and have 16 'pockets' for charts.

The structure is 1x6 plain-sawn red oak with 1/4 in red oak ply for the file pockets and back. In order for the 1/4 in panels to fit cleanly in the structure, I routed an L shaped slot for the front and bottom, then chopped out relief for the cross members -- pretty simple, but very strong.

I had to make a little sled for the router with an angled fence,,,the rest was just time, and a little dust sniffing.


The dry fit of parts was sucessfull, just need to round over edges of three uprights, sand the whole thing and glue 'er up. This will be very rugged and resistant to collisions from office residents. The finish will be satin urethane over a light stain.

Glued with a caulking gun which made distributing the adhesive in the little dados quick and clean. To finish up, relief was routed in the bin fronts, stained with MinWax Golden Oak and two coats polyurethane, satin.

Dogsled


I was asked to make a small, working dogsled for a customer's livingroom. I haven't made one before, so I did a little research and found an image that an Alaskan fellow made. I'll make something similar.

He wants it made of birch and I think I will use rawhide for tying everything together.

OK found some good material an time to get things started... cut some birch 1x6 x 10' for the pieces. After making the cold laminated runners, and handle bow, I had some slip in the laminations and ended up with runners only 1 in wide after squaring. That turned out OK, since I ripped one of those and used the two sections for sides.


All the parts are cut and sanded, time for the rawhide...as soon as it arrives from Centralia Hide and Fur. They sell a wide range of products including rawhide lacing at a very reasonable price.
I gave the job of lacing the wet rawhide to my wife...she's the one with the leather experience.

This is looking like it will come out nice.


I have another couple of joints to wrap with rawhide, and the final varnish coat. Oherwise, ready to deliver.

Wednesday, November 14, 2007

Bow Arm Morris Chair and Arts and Crafts Mirror


Just got an order for a Bow-arm Morris Chair and a large Mirror. The customer wants them in QSWO with the stain Stickley calls Onandoga...medium brown with some red in it.

I'll be using a new steam box for this project. I made it out of foil-backed foam insulation board. From what I read, it takes very little time to get hot inside and it sure is light! The steam generator is a two gallon 'stock pot" with a hose adapter glued to a hole in the lid.

I can't get 10/4 QSWO from my supplier to make the legs, so I'll have to go with 8/4. I don't like the 'quadralinear' technique for legs having through tenons. It makes the tenon look just like it is...cobbled together. These will have one joint down the middle of post, but grain will be matched so it will look pleasing.

My technique is to glue 1/8 in quarter-sawn pieces to the two plain-sawn faces.
The leg now has the beautiful qs on all faces, and the tenon is natural.

Another feature of my furniture is the book-matching of parts. Arms resawn from same board, legs -- especially for the front faces of legs book-matched . I also like to carefully pick out the front and side boards for the seat box, since they will get a lot of attention.

Wood's on order, so check back for updates as the project ripens.

----
Oh my! the oak is spectacular-- lots of flake and very interesting patterns. I can hardly wait to resaw this.


I resawed a 6 foot length 8/4 . The two slabs were about 1/16 different in thickness, so I had several runs through the planer to get them flat and equal thickness ... of course I have to use the sawn-side up, so it is either planer or sander anyway..


All the leg mortises were hogged out with a 7/16 drill in a jig on the drill press and then finished square with the 1/2 in bit in the mortising machine. Tenon shoulders cut on the radial saw and faces cut running over the table saw, using a little jig I made just for the occasion.

All the clean out and final fitting of joints took just a couple of hours, made the curves on seat-box and top back slat the same 36 in radius. I will attempt to bend the arms to a 36" radius as well. The consistancy should be pleasing to the eye.

Bending the 72" board for the arm went quick and easy with my wife handling the nose clamp and my belly taking the board down to the form. It took about an hour to get temperature up to 180 degrees , then I put the board in for exactly one hour. Leaving clamped for 24 hours.


update ... dry fit complete.

Upholstery ordered, cutting arm mortices. I could set up a router jig to make the morices, but I want to be sure there is an exact transfer of any minor angle differences in the square leg tenons. At two inches, any mistake will magnify. The image that follows here, shows the arm mortice almost done. Very important with oak to scribe the cross-grain line with a knife--or you will guarantee tear out.


**********************************************
**********************************************

Arts and Crafts style Mirror

**********************************************
**********************************************


This is a big one. 65 inches wide and 42 inches tall. All QSWO.

The customer has some left-over 4x4 Motawi Art tiles from his fireplace project, and would like me to place them in the mirror frame. The tiles retail for 27 dollars each...so you can imagine my joy when I dropped them on the shop floor - concrete, naturally. I tried to glue them back, but it was no use.... I sent off and order for the replacements, and $170 later, we're ready to go again.


Ready for tile panel.


Almost done. I'll transport without mirrors, and install them on-site. Just some wax now and a good buffing.

I'll follow up with a shot of the installation.


Saturday, November 3, 2007

Mahogany End Tables


These were made for a dentist's office to match other furniture in the waiting room. The interior designer wanted the floating top look. These were done with African Mahogany and dyed with a lye wash. Lye aka Drano aka sodium hydroxide will make mahogany turn a rosy reddish-violet. A nice base for stain. I mixed 1 Tbsp Drano in 1 qt water.

Two coats of shellac and some Briwax to finish.

The customer wanted glass tops, and with this small table there shouldn't be any problem with changes in humididy, especially since the glass is not really in contact with the wood, but felt pads.


And now a note about shellac. This is the unsung hero of finishes. It is non-toxic, natural, quick drying, easy to repair, beautiful, and cheap. And spraying it doesn't make your brain cells die like lacquer.

Shellac is a resin produced by a bug in India. The resin is extracted, purified and sold as flakes. The craftsman mixes flakes in alcohol to make his finish. There are some companies selling ready-to-use shellac, and generally they are very good and useful. I especially like the spray can for doing small projects or touch up.

Get the full story on shellac here.

Kids need furniture too!

I make these child-size rockers in style of the Stickley. Same basic construction, same great woods. I did use vinyl instead of leather for cushions -- let's be real, OK. This is for a kid.

I added a 'wishing stone', a dichroic/glass bauble to each chair. Touch the stone inlaid in the leg, and your wish will come true.


A young man in a mahogany rocker with a glass and dichroic moose inlaid in the front.


++++++++++++++++++++++++++++++++++++++++++++++++++++++++++++++++++++++++++++++++++++++++
++++++++++++++++++++++++++++++++++++++++++++++++++++++++++++++++++++++++++++++++++++++++


Baby cradle in Cherry with Pooh carved in headboard.


Arts and Crafts Fern Stand


I came across this design in an old magazine...like 1930s era. I liked the look and it was straightforward to construct. I made one for the Holiday show at Egan Center a couple of years back.

We had several folks stopping by the booth, and when I ended my current conversation I turned around to see a fellow on his knees running his hands over and under my fern stand. Immediately, I realized he was blind but certainly seemed to appreciate furniture. At that point, he remarked "You do very nice work!"

That was a pretty meaningful compliment, because there wasn't much hidden from this fellow's perspective. He and his wife liked highly figured maple, and could I build one with that species? I can and I did. They wanted no stain, just a crystal clear finish.

Friday, November 2, 2007

The Handy Two-Stepper


I first saw this design in a book of Shaker furniture 25 years ago. I made that first one with oak and gave it to my brother...who still has it. I like to make them from 'natural' maple with lots of color in it or quarter-sawn white oak. I use the Leigh Dovetail Jig to make it possible to get the project done in a reasonable time, but there is still plenty of hand work getting things to fit and look good.


As to applications, it is enormously practical, working as a step-stool, book stand, plant stand, end table ... and three girl support structure.

This one gets some serious use!

"Antique" Cherry Sofa Table

Decorator and customer decided they wanted a new 'antique' for a sofa table, so after looking at the image decorator supplied, I came up with this design in cherry. The panels are dyed and stained black with cherry beading around the edge of each panel. Actually, the panels are just rectangles defined in the apron by a 1/4 in routed trough.

Customer asked for the scroll work on bottom. I used a bread-board style top with black dyed cherry accents and pins.

While experimenting with ways to age cherry, I tried some lye wash and that really will redden cherry dramatically. I decided to just use a light brown stain -- Minwax Golden Oak after a wash coat with a little dilute shellac to keep the splotch monster at bay.

It turned out to look like a well-cared for older piece.


L&JG Stickley Rocker

When I was a boy, my grandparents had a rocker that all the kids thought was really cool. The back could swing down and be a ladder up to the seat. Needless to say, one of the slats was busted by an overweight kid, but when Grampa Archie died, Gramma Jewel gave me the rocker because she knew I always liked it.

Well, I had forgotten all about it until she gave it to me, and I had since learned a little about furniture. The red "L&JG Stickley" lable was still visible on the back but the chair had certainly seen some difficult years. The arms were a little splintered on the edge and somebody had traced the grain with their thumbnail. Worst of all was the mauve plastic brocade cover for the cushions. Practical and quite ugly.

I cleaned it up as best I could, and made some new custions, but I really wanted something a little less worn with the same dimensions.

Out came the tape, pencil and paper and I made a measured drawing of this rocker. It is the pattern from which I made several rockers. They are all quarter-sawn white oak, with pinned mortise and tenon joints. Leather or fabric cushions per customer request. As an aside, the endtable has a slate top...no need for coasters


This last chair had such incredible color and grain, I couldn't bear to stain it. So it got several coats of an oil wipe-on finish I made. Resawing the 2x6 that would make the arms was one of those exciting times when something unexpected and wonderful presents itself. I sure hope the owner appreciates it for a long time.

Ming Coffee Table


This interesting table was commissioned by a customer who wanted a ming-style table with a granite top for her living room. The dimensions were pretty large, 42 x 60, but the added 300 lbs of granite made for an interesting project.

I was given a photograph of the general design idea, and found some others online to help put a good working drawing together. The Ming Dynasty tables were notable for the legs -- curved or straight, they ended with a horse-hoof element.

I decided to build 6x6 blanks for the legs using 8/4 African Mahogany. The rails are 2 x 4 and are morticed into the legs with traditional European joint. The Chinese mitered joint is a little time consuming for this project and customer was happy with the idea.


I cut the legs on bandsaw, morticed and sanded to 150 grit. The rails had to be tenoned and dry-fit so the leg curve could be transcribed to end of rail. I ran the rails through table saw and hand planed to approximate shape and finished with belt sander and palm sander. Then all glued up.


The 1/2 x 2 mahogany risers were glued and screwed to rails and 2x4 fir support lattice installed to hold the 3/4 plywood support for granite. After everything was fair and sanded, I cut a 1/4 in. vee with the router on inside edge for accent.

Dyed before staining to bring the different colors into harmony.

Thankfully, I didn't have to mess with the granite. It was installed after I delivered the table.

Looked pretty good!


Some Additional tables for the Media Room:

The customer liked the Ming table, so she had me make an end table in that style and three round tables for the long sectional couch.

I used the vacuum bag to make the top for endtable since it was so large and solid wood for the round tables.

A note on making the round aprons. I made up a form with three layers of 3/4 MDF cut to the inside dim of apron. The form was brought to perfect round by spinning on a center pin against belt sander. Belt sander was clamped on its side and the form spun against it.

Recipe is 1 layer of 1/8 bending poplar, 2 layers of 3/8 wiggle board and finally the finish veneer of African Mahogany. To get a perfect joint on the veneer, I just cut 1 in long and taped the surface of lower piece where it would overlap that 1 inch. After applying glue and temp clamp, I cut the overlap with a sharp blade and removed the waste. Then put on the band clamp, and we're done!

All pieces were dyed with a secret mixture of red, brown and black then stained with Minwax Red Mahogany.


Thursday, October 25, 2007

Vennering with a vacuum press

If you get to the point where veneering is something you want to attempt, there are timeless methods such as "hammer veneering" using hide glue that have been successful for many years. However, to do large or curved projects I found the vacuum process to be excellent.

You can buy vacuum pumping systems or build one from a kit and save yourself hundreds of dollars.


I heartily recommend the system kit provided at joewoodworker.com. This is what I purchased:

1 x Project: EVS KitAuto-CyclingPump System (kit-evs) = $147.50
EVS Option 120 VAC
1 x Vacuum Pump - Industrial Duty 5.5 CFM110-120 VAC (pump-55) = $315.90
Vacuum Dampener Option Yes, include the dampener
Hardware Option Do not include mounting screws
Discount Option My order includes a builders kit


I wanted the high volume, 5.5 cfm, to allow for doing large items like doors and wall panels. I also bought enough 30mil polyurethane to make a bag 4.5 feet x 9 feet.

The bag will seal itself against the wood and not allow all the air to escape unless you add a platen with air channels or lay a plastic mesh on top. For small, flat panels I use a piece of 3/4 in plywood with a saw kerf 1/8 in deep every 2 inches in both directions. Bigger panels get the mesh.

The pump takes about 2 minutes to empty the bag and taking the pressure down to 21 inches Hg is another minute. I find it cycles on about every 15 minutes for a few seconds.

The valve attachment to bag leaks if it isn't in the right position sometimes. So the next time I have minutes to burn, I'll pull the valve off the center postion and patch the hole, then install it on the edge of one end.

Saturday, October 20, 2007

Bandsaw blades

A bandsaw is an indispensable tool, but to get beyond just cutting circles and little stuff, we have to get serious about tuning it up -- especially for resawing. Resawing accurately opens up a world of possibilities to you. So what kind of blade is best?

Highland Tool makes a Wood Slicer 1/2 in resaw blade that works well with QSWO 4 inches thick. I also use the Olson 1/2" resaw blade. And apparently, the Lenox Pro Master III carbide-tipped blade is a beauty for resawing. 3 or 4 teeth per inch, but at 80 bucks a blade I don't think I will be getting that one soon. Gee, I have to plane the resawn boards anyway. Seriously though, the advantage of carbide is that you don't have to resharpen or replace the blade but once every time your taxes are reduced, i.e. not very often.

A couple of key points to consider before spending a lot of money on blades -- check your saw setup, and consider the type of sawing you'll be doing. Obviously, resaw needs fewer teeth. More teeth equals more friction equals more heat. Of course, you might enjoy that odor of toasting wood.

As to setup, the rub-blocks/rollers and bearings must be carefully adjusted. I'd throw away the factory rub blocks and buy the roller or bearing upgrades. You will thank me.

Adjust the blade position on the tire for proper tracking -- takes some testing. And as for tracking, you need a good line to follow and a guide to keep board at 90 degrees. Just cut an L shaped bracket and 45 the edges to give a single point of contact precisely where the blade enters the wood.

Adjust the blade tension. --Here is a problem. You can't trust the tension guide on the saw, so for most cutting, just put your guide up to 6 inches and tighten until blade deforms 1/4 inch when you push it sideways.
When resawing, crank up the tension as far as it will go (or as far as your anxiety will go) . Take 'er back down when you're done.

Friday, October 19, 2007

Building a Cedar-strip Canoe

I had a hankerin' to build a canoe a couple of years ago. There is nothing quite like building your own boat, and I sure as heck wasn't going to pay $3000 for one from REI!

After a bit of research, I found Gilcrist's book and decided on a plan. Unfortunately, there are no local suppliers of cedar strips. Walking through Home Depot one day I spied a new unit of 16 foot cedar 2x6 just looking for a home. I picked through the entire unit to find 6 relatively clear boards.

We sawed them into 1 inch wide strips, turned those 90 degrees and cut 1/4 in strips, After that, I ran them through the router table beading bit, then the cove bit.

Next the strongback was built of 2 x 6 fir and station molds attached. Once they were plumb and fair, I taped all the station edges with masking to keep glue off them.

Sheer planks positioned and laid. Then it is just a lot of glue, staples, nails and time. If you click the image you can see all the staples.


The fiberglassing didn't look as nice as I had hoped.....all glassy smooth and professional like the images on web. I mistakenly thought the epoxy would fill any voids and sanding the surface perfectly flat was a waste of time. Oh my, was I wrong. When I laid the glass I found that the cloth just tents over the gaps and leaves a white spot.

Canoe version 1.0 had 3/4 x 3/4 ash inwale and outwale screwed every six inches and ash decks about 12 inches long. Beautiful but a little heavy. The boat weighed almost 70 lbs. The seats were fairly large too and I used cane for the seat. The cane tore, so I took off the gunwales, decks and seats and replaced them with 1/2 x 3/4 fir inwales and outwales -- not screwed but epoxied. I added little trapezoid shaped doublers where thwart and seats attached. Seats were ash 1x2 but only 7 in wide. Now the weight was only 55 lb. Much nicer now for portaging. The total cost was less than $600, most of which was the glassing material.

Well for a first time job, it turned out ok, and heck it floats! We have enjoyed many trips to the Kenai canoe trails -- impossible without a boat.


So, on th next boat I will do more surface prep before fiberglassing, But gee, I'm having an awfully good time right now, so it might be another year. How did the old song say it? "Love the one you're with" Thas' right baby!

Wednesday, October 17, 2007

Choosing Radial and Table Saw Blades

I did an inventory of my blades, while awaiting the arrival of a new Forrest Woodworker II. Part of the shop remodel is to make a blade caddy that is easy to use and has labels for blades. This seems like a good time to refresh my memory on proper blade selection.

Update: I finally got the Forrester Woodworker II and it is an awesome blade -- sharp, smooth-cutting and quiet. It makes clean rip cuts that hardly need touch-up, and cutting through oak end-grain leaves a shiny-smooth surface.
I also picked up the Forrester Dado King 8" set. Pretty expensive at $200 but it makes beautiful cuts with 4 - 1/8" rakers, 1- 3/32" and 1- 1/16" raker. Therefore, making dados to match thinner plywood real easy.
Systi-matic has a good explanation of tooth configurations. But basically, cross cuts need the alternating top bevel (ATB) to slice cleanly across the grain. Rip teeth typically have the ATB teeth with a flat raker added to clean out the cut much as a chisel would. You might find the flat raker with the corners ground off and they call that a Triple Chip design.

Tooth hook angle is very important....teeth that enter the wood leaning forward (positive angle) will cut your rips faster and be more 'aggressive'. Aggressive, like when the radial arm saw wants to climb over the board..and kill the motor...yikes! That's where you need a low or negative angle tooth. The same goes for laminates.

Of course, you have to choose the right blade but as to performance, be sure that there is no wobble, vibration or poor alignment in your saw.

The link-belt and the milled pulley on your motor help a lot with vibration.

Finally, if using an underpowered or portable saw, a thin-kerf blade is a good choice.

Do a little research and find out how to tune up your particular saw.

--------------------------------------------------------------------------------------------------------------------
THREE BASIC TOOTH DESIGNS

Each different grind has a different purpose. A ripping blade will have a Flat Top Grind (FTG) for fast cutting with the grain. A cross cut blade will do the best job with an Alternating Top Bevel (ATB), cutting across the grain like a knife and producing a very smooth cut. A blade with Triple Chip Grind (TCG) is good for all-purpose cutting and also gives you a very clean cut. TCG blades are also good for cutting non-ferrous metals and plastics. Of course, no matter which tooth design you're looking at, more teeth will give you a smoother cut than fewer teeth.


Three Distinct Tooth Designs

Sharpening carbide blades...obviously not something for the shop. So where to go?

In Anchorage, call Willie Accu-Sharp (907)337-9490. He does an excellent job on carbide blades and router bits.

Friday, October 12, 2007

Shop efficiencies


Wow..I was google-ing for some ideas on making my shop more efficient and came upon this site, Super Wood Works. It is one of those shops that looks like he has done a whole lot more making it look cool that actually producing furniture, but hey, some people have lots of time and money....

What I really appreciated was the extensive use of the cleat system for holding stuff on the walls. I had used the cleats in past for setting cabinets, but never made the leap to this idea.

He runs three cleats the length of his wall at approximately 36, 60, and 84 inches from the floor. He hangs cabinets, tools, router table, pegboard....whatever. So when you get to needing that cabinet a little closer, just slide it down the cleat -- everything is modular!

Right away I built 4 cabinets and 2 peg racks and it is the best thing I've done in the shop in years. Made the cleats out of some pine material I had laying around and screwed it to the studs.

I also put all my Jorgensen Wood Screws on a single cleated board, and now I can store them out of the way and move the whole mess near assembly table when I need them.

BTW, the angle on cleat doesn't need to be terribly acute. Probably 70 degrees or so would be fine.


+++++++++++++++++++++++++++++++++++++++

Idea #2 Rolling carts

For several years, I have used a rolling cabinet to store a lot of my small tools and other stuff I like to have within reach. I got the idea from a book a few years ago. The author uses three carts named Larry, Moe and Curly. Curly and Moe are lumber transport and staging, I picked Larry - the tool stooge. It is approx 24" square and 36" high. The four drawers store small tools and sanding disks. Outside I have racks for chisels and saws, my oak mallet, and a few clamps. the top serves as a small work surface.

I advise you to use fairly big wheels to easily negotiate a messy floor.


+++++++++++++++++++++++++++++++++++++++

Wire carts. I bought a few of those 6 ft high rolling shelf units with 18 in. x 48 in. shelves. They are great for storing power tools and other stuff that I can move around at will to change my work area. In a small shop, it is almost essential to be able to move things around. Only my radial-arm saw is stationary.

+++++++++++++++++++++++++++++++++++++++

Multi-use table. I built a work bench the same height everything else in the shop is...36 in. A consistant height makes everything work as a bench-extender I set the bench about 12 inches away from the saw. Now I have a run-off table as well as an assemble table/work bench. The bandsaw is tucked between the arms of table saw fence guides.

+++++++++++++++++++++++++++++++++++++++

Knock-down stages. In the same book I read about rolling carts, I saw the idea for these stages. One is 12 inches high, the other is 35 inches. For the smaller ones, cut 4 , 12 x 36 pieces from 1/2 or 3/4 plywood. Cut a notch half way through the center and relieve the weight by cutting out holes in the 'web'. Now you have lightweight, knock-down legs for staging.


Here you see the little stage holding up a Ming table I'm staining.

Saturday, October 6, 2007

Veneering - Where Angels Fear to Tred, I rushed in.


I have been working for the last several months, off and on, to perfect veneering a 42 inch square coffee table built to resemble what the decorator said was a Chinese Scroll Table. I have no idea how the Chinese did it, but here is my shot at it.

I decided to use the torsion-box concept since that would be lightweight and strong. As you can see in the picture, it is built up of a grid of half-lapped 1/2 inch plywood units. There are 84 joints, each of which is glued with urethane construction adhesive. A 3/8 wiggleboard skin was glued to each side, but required kerfing to make the tight radius.

Such a structure achieves its remarkable strength from the simple transfer of load. As a load is appled to the table, it caused the top skin to compress (squish together) and some of that pressure is transferred via the skeleton (the web) to the lower skin which is stretched. You see that now the load is no longer just downward on the parts, but sideways! As long as there is a good bond between the web and the skin, you have a very, very strong unit. I weigh 180 lbs. and could jump up and down on the table without any problem.

Version 1:

My first attempt at veneering this beast was to use the iron-on technique with PVA glue. I coated 10mil paper-backed mahogany and the wiggle-board substrate with a generous layer of Titebond2. After drying, I began ironing it on with a regular iron set on high.


Everything seemed to go OK, until I put the finish on. I could then see some bubbling. It didn't seem too bad, but when I delivered it, the veneer began to bubble, probably because of the high water content in PVA glue. The next month I brought the table home, pulled off the veneer, cleaned it up and decided to use contact cement. That ought to hold 'er down!

That was a nightmare. I decided to try using a 6mil plastic barrier between the veneer and table while I pressed from the center out pulling plastic as I went..

Well, the plastic got stuck in the contact cement while pressing down the large chuck of veneer and totally ruined the lamination. Arrrghh!

Ripped that off, and contact cement isn't very happy about releasing prisoners, so I ripped up little chunks of the substrate too. After filling and sanding, did it again, using a joint down the center, so I would have two relatively narrow pieces to work with...but it didn't look perfect, and I was out of time. Had to finish and deliver. I Told the customer I would replace it as soon as I could. It looked pretty good...but soon it developed bubbles and still had a few uneven spots I missed while cleaning up the old contact cement.

As I look back, there are two glaring issues. One, using a water-based PVA glue added too much moisture to the system. Even if the project laid flat initially, the moisture was going to try to get out and cause bubbles. PVA is just not appropriate for a large project anyway because of its tendency to creep. That's why the old timers used hide glue...no creep.
Number two - don't use contact cement...it has no advantages and lots of disadvantages.

My wife says she is really hating this table. But I can't just give up--no matter what it costs me. Besides, this can be a learning situation -- you know, making lemonade when life hands you lemons.

As an old friend in the computer systems administration business told me once. "Don't feel bad when it takes you a long time to figure something out...it just means that once you've got it, you're that much farther ahead of the rest who don't know how to do it--and you're valuable now."

So I went home and thought about it, did a little internet research, and decided to try vacuum bag pressing. At joewoodworker.com I found and bought the vacuum pump kit and enough 30mil urethane film to make a 4.5 ft x 9 ft. bag. The pump will pull 5.5 cfm, which should be good enough to handle the big bag I want to make.


The pump I built works flawlessly, and after testing, I pressed up some flat table tops. Using Unibond-800, I find I get a very flat, bubble free and so far, stable laminate. I have to give praise to Joe Gorleski for creating a supremely practical and functional pump kit.


Version 2:

So I rebuilt the table, making the shoulder radius a little larger (8 in) so I didn't have to kerf the wiggle board.

Another change, I realized I really didn't need to glue each joint in the skeleton...nor did I have to bother with all those time-sucking lap joints. The wiggle board just needs support to withstand vacuum pressure and enough web to transfer load to lower skin. So I reduced the number of cross pieces and just brad-nailed them together, then used blue 1 1/2 in construction foam as a space filler and skin support. The foam also adds an echo-killing feature. The table won't sound like a drum when thumped.

I decided I would just pull the vacuum bag over the table and veneer like putting a sock on your foot. The vacuum should pull everything flat.

An assistant and I worked to get the Unibond applied, lay on the veneer, staple the veneer on one end, and start suckin' air. Pulling a 30 mil plastic bag over that table was not easy - definitely a two man job.

Alas, and alack. got a big wrinkle in the veneer on the end by the staples....I tried repositioning and rolling out the wrinkle area and removing the staples...but it was another disappointing and now expensive failure.

Version 3:

I figured I better do some drastic design change. I opted for rebuilding the skeleton in 5 sections. A 26.5 inch flat section for top, two curved sections 1/4 of 8 in radius, and two 8.5 in. leg sections. After pressing the flat panels and the outside of curve sections, I will glue and screw everything together. I will have to hand-veneer the inside of the curved section. Your prayers are welcome.

The panel on left shows the temporary pine edges with blue masking which keeps the over-size veneer from breaking over the edge. Center shows how veneer will fit on the assembly, and the right is completed top section.

Also switched to Oakwood Veneer product called Bubble Free. It is a 20mil product that includes a moisture barrier. I will use Unibond-800 for completely water free non-creeping adhesive.
--------------------------------------------

Update - Looking good so far. I got the large center section veneered without a problem, thanks to my partner/wife who had a good suggestion about taping the veneer down till we could get into the vacuum bag. We had to mix up two batches of Unibond, but it seems to cover about 10 square feet per cup of resin. After five hours in the bag at about 70 degrees (electric blanket), lamination was perfect. I really like the 20 mil thickness because it doesn't telegraph the substrate irregularities like the 10mil.

Just popped the 'leg' sections in the bag and will let them cook for five hours while I go try to find an angle attachment for my drill. Screwing the curved shoulders to the flat sections will require some tight-quarters right-angle drilling to bring the surfaces together tight and true.

------------------------------------------

Update - The veneer attached very nicely to the curved 'shoulders' but the high pressure of the vacuum bag was too much for the wiggle board and the curve was not fair. As you can see from the picture above, which is built the same way, there were just 5 curved sections with 4 long pieces. That allowed for too much cross-grain flexibility. Perhaps I should adjust the vacuum pressure to just pull the veneer down and stop there. Currently set at 21 in. Hg = 1485 pounds/sq ft.

Pump pressures
in Hg lb/in lb/ft
10 4.91 707.27
11 5.40 778.00
12 5.89 848.72
13 6.39 919.45
14 6.88 990.18
15 7.37 1060.90
16 7.86 1131.63
17 8.35 1202.36
18 8.84 1273.08
19 9.33 1343.81
20 9.82 1414.54
21 10.31 1485.27


I have plenty of wiggle board and veneer, so I decided to rebuild the shoulders using 13 curved sections and a single row of spacers at the center. That should give the curve some integrity and indeed it looks very nice after gluing down the wiggle board.

Re: screwing the sections together, there's not enough space for right-angle drill attachment, so I'll have to use 1/4 x 11/2 lag screws with a socket wrench.
---------------------------------------


Well, it's about time! The veneering of the new shoulder worked perfectly... I had lowered the vacuum pressure to 15 inches Hg (1000 lb/sq ft) and the surface is quite fair. Victory at last...shucks, it's only been 11 months.

Here's a shot of the shoulder right out of the bag...


The sections are a little time consuming to attach using lag screws when I can only get 1/4 turn or so, but they will come together nicely...here is a dry-fit view.

The joint will be routed after gluing for an inlay of mahogany strip. Customer wants the inlay flush, so I'll probably do a lot of careful work with a scraper blade.

Still have to build the feet and edges, but we're getting close.


Hey, just bought a very cool tool....since the socket wrench was a little too big to use efficiently in such a narrow space, I went to Lowe's and looked for a ratcheting wrench. I bought the Flex GearWrench for $11.50. It is a dream to use, very nicely made and even has little marks on one side of the wrench to let you know which direction you're turning the target.

A well-made and useful tool is a beautiful thing. I wonder if God is pleased that way when one of His 'tools' is useful? I'd like to think so.


All the glue-up of structure is done, the substrate for inside of curve is glued, so now just have to veneer those... two little inside curves. This might be a case for the return of contact cement. Such a narrow piece should be easy to lay. It will be out of sight and out of harm's way -- so why not?

Indeed, the water-soluble contact adhesive worked very well for the inside curve, thanks to my beautiful assistant - the blonde cowgirl Ms. Tinklewater. Will be milling some mahogany for the inlay strips.


Note for future construction: I think it would be best to build a framework to hold the sections while screwing together. Perhaps just a temporary 'edge' piece to keep section aligned the long way.


Routed 1/4 in. groove on top to inlay strip to mask joint. the side joints are 1/2 in. The color difference between veneer and inlay should be minimized by the dye coat.


And added the feet, lovingly carved with the table saw, plane and sander. Edge pieces made of some Hondo I have in stock. Biscuit joined the three boards making up each edge assembly and glued the oversized assembly to the edges. A flush trim router bit will bring it all home and be ready for round-over. Routing those edges took about 2 hours and lots of dust and cramps in my hand, blood on the wood.

I was doing the last six inches and grabbed a little too much wood with the router and split off a big chunk. Glued it back on and finished, but isn't that the way things go? Ya think yer home free and wham.


Flush bit work done, and round-over was quick work.

And now she's ready to sand and finish! The sanding of the edges on ends was pretty slow-going hand work to get some of those router blips smoothed out. One just needs patience, but if it is going to be touched by the user it has to be smooth.


After a dye coat, stain applied, a seal coat of shellac. Finish with 2 coats Urethane.

A coat of wax and ready to deliver!